

 InputSettingsPanel and InputBindingOptions
An InputSettingsPanel is a controls settings screen. It shows one row for each button action of an InputActionAsset. Each row has a KeyBindingField for the keyboard or mouse binding and one for the gamepad binding. It has the members of the SettingsPanel base (see Custom settings panels), Actions and FieldOf(action, column). It needs the Input System package.
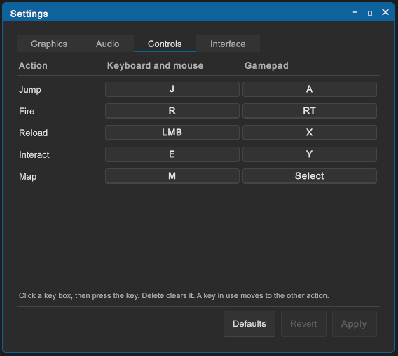
<tb:InputSettingsPanel name="controls" prefs-key="mygame.input" />
// The actions of the game. The panel reads their bindings, with the saved paths over them
var panel = root.Q<InputSettingsPanel>("controls");
panel.Actions = myActions;
How to use the panel:
- In the Project window, right-click a folder and click Create > Input Actions. Name the asset, for example
GameActions. - Double-click the asset. Click + next to Action Maps and name the map, for example
Player. - Click + next to Actions and name the action, for example
Jump. In the properties on the right, set Action Type to Button. - Click the binding under the action. Set Path to a key, for example Keyboard > By Location of Key > Space.
- Click + on the action row, click Add Binding, and set Path to a gamepad button, for example Gamepad > Button South.
- Do steps 3 to 5 for each action. Click Save Asset.
- Add a field
public InputActionAsset Actions;to theMonoBehaviourof your screen. Drag the asset on the field in the Inspector. - Set
panel.Actions = ActionsinStart.
The player clicks a key field and presses a key or a button. Delete or Backspace clears the field, and Escape cancels. Apply sets a binding override on each changed binding and saves the paths. Revert goes back to the applied paths. Defaults shows the paths of the asset.
InputBindingOptions works without the panel:
// At the start of the game: set the saved bindings
InputBindingOptions.LoadSaved(actions, "mygame.input").Apply(actions);
actions.Enable();
| Member | Description |
|---|---|
InputBindingOptions.Capture(actions) |
The paths in effect now, with their overrides. |
InputBindingOptions.Defaults(actions) |
The paths of the asset, without overrides. |
InputBindingOptions.LoadSaved(actions, key) |
The paths in effect, with the saved paths over them. |
PathOf(binding), SetPath(binding, path) |
Reads or sets the path of one InputBinding. An empty path turns the binding off. |
Apply(actions) |
Sets the paths as binding overrides. A path that equals the path of the asset removes the override. |
InputBindingOptions.ButtonBindings(actions) |
The bindings that the options have, as pairs of an action and a binding index. |
Tips:
- Call
LoadSaved(actions, key).Apply(actions)at the start of the game. Otherwise the saved bindings are in effect only after the player opens the panel. - The options save the paths by binding id. An
.inputactionsasset keeps its ids, so a renamed action keeps its saved key. - Actions made in code get a new id in each session, so the save does not match. Give each binding a fixed id:
new InputBinding { path = "<Keyboard>/space", id = new Guid(1, 0, 0, new byte[8]) }. The GameMenu example does this inSettingsController.addControls. - A key that another action of the same map has in the same column moves: the other action takes the old key of the changed action. Two maps can share a key, because a game enables one map at a time.
- The panel shows button actions only. A value action, and a composite such as a WASD move, has no row.
- The panel shows one binding for each column. A second keyboard binding of an action keeps its path and has no field.
- An action without a gamepad binding has an empty gamepad cell. Add the binding to the asset to get a field.
- With more than one action map, a title row shows the name of each map.
- The row shows
InputAction.name. Name the actions as the player reads them, or set the text of thetb-input-settings__actionlabels afterActions. - The overrides are on the loaded asset, not in the asset file. In the editor without a domain reload, they can stay after play mode ends;
actions.RemoveAllBindingOverrides()removes them. - Without the Input System package, the class does not exist, and UXML with the element fails to load. A screen that must load in both cases adds the panel in code inside
#if UITOOLBOX_INPUT_SYSTEM && ENABLE_INPUT_SYSTEM, as the GameMenu example does.